Thursday, November 17, 2011

Building a World in a Box...


This post was inspired by the Pink and Green Mama.
I was reading her blog and stumbled on her halloween sensory bin. Suddenly I was filled with ideas and couldn't wait to get building little worlds in a box for my own little ones to discover. 
My kids and I spent the weekend hunting and gathering, scavenging, and searching for things we could put in our little bins. The following photos and ideas are the culmination of many minds...my own 6 kids, myself, and a remarkable woman who calls herself the Pink and Green Mama.

First of all...you need to know one very important rule about building a sensory bin...
THERE ARE NO BAD IDEAS!
(Unless, of course, you try and fill a bin with organic red quinoa that works out to be $33 for a bag HALF the size of a loaf of bread!!) 

The first bin we decided to build was the "Farm in a Box"
We chose split peas for the substrate and then filled it in with all kinds of plastic farm animals. And what farm is complete without tractors? A trip to Peavey Mart had us all stocked up in al colours and styles. We even found a little plough attachment. We added a little stable, some fences, wheel barrows, buckets, hay bales, plastic veggies, and animal brushes.
Little piggies eating from the trough...

Little baby chicks peck away at the grass...

Don't worry if all your pieces are not to scale. This is not a science of exactness, it is a science of discovery and imagination! 
Feel free to add whatever YOU might think 
would be fun in your "farm in a box"

Our next little world we built was a "Dinosaur Dig in a Box"
The substrate is barley, a few split peas, and a bag of mixed beans. Note that each bin took approximately four 900g bags of substrate. Oh, and my 10yr old son added broken pieces of dried wholewheat spaghetti so he could make "nests" for the dinosaur eggs.
Most of them were purchased at WalMart for less than $2 a bag.
The fossil heads were purchased in a tube at Michaels Craft Superstore. And you can find plastic dinosaur skeletons and figurines just about anywhere now... dollar stores, Chapters, toy stores, etc. We added a couple mini garden rakes for "digging up bones."
We added a few "live" dinosaurs to further extend the play possibilities of this bin. The boys especially love the "carnage" this box lends itself to! Hehehehehe! The beans become the eggs and then the egg stealers steal the eggs, and then the cranky mumma comes along...and well...this is NOT a quiet world in a box! That's for sure!

Our next bin is "Outer Space in a Box"
This one was very simple and quick. We used four bags of black beans, 2 bags of glow in the dark stars from the dollar store, a couple bags of sparkly pompoms for "meteors", a tube of plastic planets from ToysR'Us, and a yellow bouncy ball for the sun. Then we added a tube of astronauts and satellites, rockets, moon buggies, and space shuttles.
This is a great bin for learning your planets! And the best part is, the stars glow in the dark, so it's even fun with the lights off!

Now this box is my favourite box! It's an "Under Water Kingdom in a Box"
The substrate is 3 bags of aquarium gravel. Then we added a bag of plastic jewels, which we found in the fish section of the pet store. We also added 2 bags of store bought seashells...99cents/bag at Pet Smart. I also had some real oyster shells that I had collected on the beach in the spring so I put them in the box. My 6yr old daughter immediately fashioned an oyster shell chair for her mermaid. 
You can fill your under water kingdom with all sorts of plastic ocean creatures. We also put little 99cent aquarium plants in ours to make more places for little sea animals to hide.
A lobster jewel thief...

...and his octopus accomplice!

The underwater kingdom has so many possibilities, and hours of imaginative play awaits!


Our final box was built entirely by my ten year old son. 
It is "Construction Site in a Box"
He chose dried chick peas, green lentils, wheat, and a bag of mixed beans for the substrate. He added a bag of shiny brown rocks from the aquarium section of the pet store, and 2 bags of wooden blocks from the craft section of the dollar store.
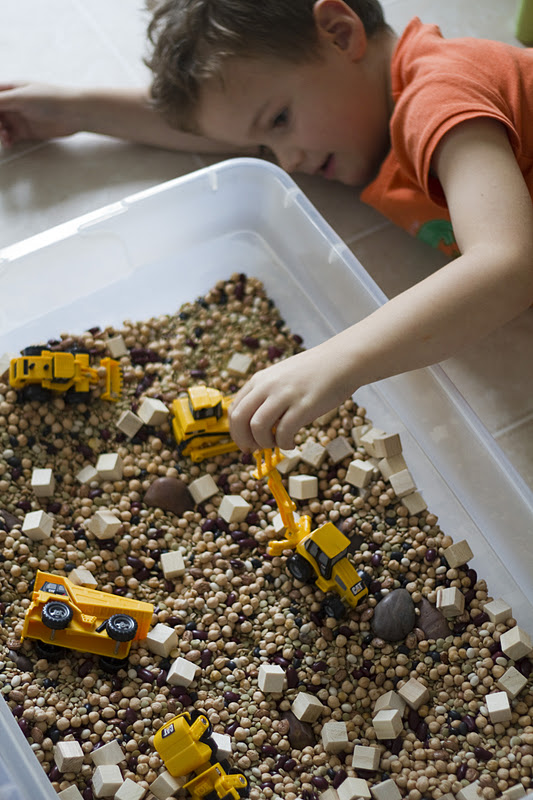
We bought an $8 set of mini CAT machines at ToysR'Us and the hauling and scraping, filling and dumping began!
My 5 year old son plays with this one for hours...right from the time he wakes up in the morning!


The following Monday, I added our little "worlds in a box" to my dayhome space. The kids played with one after the other, after the other. 

They were a hit! The only trouble the kids had with the bins, was...
"WHICH ONE DO I CHOOSE???"

Please let your imaginations fly when you build your worlds. The sky really is the limit! We are already collecting items for our "Winter in a Box"...the kids can't wait for this one! And if you build your own boxes that are different than the ones posted here, would you please come on back and tell me about them? I'd sure love to hear your ideas!!

Thanks for stopping by!!


Sunday, June 26, 2011

Take a Little Thyme...


On one of my trips to the local Farmer's Market, I bought myself a whole big bunch of potted herb plants. But the one that smelled the best, was the lemon thyme. I kept pinching the leaves and smelling my fingers...all the way home.


I had no real idea how or where I would use the thyme, but I figured anything that smells this good has GOT to taste good too. 


I love the smell, taste, and colour of lemons...especially in a dessert. But thyme? Could I get away with it? Hmmm...I say,"why not?" And so my taste buds started to tingle as I imagined my mother's snickerdoodle recipe transforming itself into a sugar cookie with a little lemon thyme. And well, I was right. They are delicious. And rather simple. So let's get started...

Cream together 1/2 cup of softened butter, with 3/4 cup white sugar...then add your egg and the seeds from 1 vanilla bean. (If you don't have beans in your pantry, use 1/2 tsp vanilla extract)

Add 1 tsp of grated lemon zest...

And 1 Tbsp of lemon honey
(if you do not have lemon honey, add 1/2 tsp lemon juice to 1 Tbs of plain honey)

Mix it all well in your mixer or with a wooden spoon.

Finely chop 2 tsp of lemon thyme leaves and add to creamed butter, sugar, eggs, zest, and vanilla. 


Place in your flour sifter, 1 1/2 cups white flour, along with...
1/4 tsp each of kosher salt, baking soda, and cream of tartar.

Sift all together into a mixing bowl.

Add the wet ingredients to your dry ingredients and mix...
First, with a wooden spoon,
And then, get your hands in there and make a nice, squishy ball of dough.

Roll the dough into 1 inch balls and roll in berry sugar...
Regular granulated sugar will work too, but I find it grittier on my teeth.

Place them on a parchment-covered cookie sheet...
Press them down with a fork...and bake at 375° for 8-10 min. 

If you find your cookies are turning brown too quickly, turn your heat down 25° and cook them closer to the 10 minute mark. The cookies will be golden on the bottom, but appear a wee bit undercooked on the top. They should still be fairly cream-coloured...not golden. If your cookies are a bit too puffy, press them down with the bottom of a glass when they are hot out of the oven.

And there you have it...a "snickerdoodle-turned lemon cookie" and all it needed was a little bit of thyme.

The Recipe in Short...

Lemon Thyme Sugar Cookies

3/4 cup white sugar
1/2 cup butter
1 egg
1 vanilla bean or 1/2 tsp vanilla extract
1 tsp grated lemon zest
1Tbsp lemon honey
2 tsp lemon thyme leaves

1 1/2 cup flour 
1/4 tsp kosher salt
1/4 tsp baking soda
1/4 tsp cream of tartar

Cream butter, sugar. Beat in egg, vanilla, zest, honey, and thyme leaves.
Sift together the dry ingredients.
Add wet ingredients to the dry ingredients. Stir and form a dough ball.
Press down with a fork.
Make 1 inch dough balls, roll them in berry sugar, place on parchment-covered baking sheet and bake.
357°F for 8-10 min

(Oh, and I won't tell anyone if you don't add the lemon thyme...it's not easy to find on a whim. So just go ahead and make a lemon cookie if you can't bring yourself to wait!)

Enjoy! And thanks for stopping by!


Tuesday, June 21, 2011

Dandelion Bouquet...


If I had a nickel for all the bouquets of dandelions I have had the pleasure to receive from each of my 6 children, I would be a rich little Mumma. 
There is nothing like the start of the dandelion season. The little yellow blossoms start popping up all over the city. And while most people are cursing at them, I am smiling. First of all, what's happier than yellow? And secondly, when else does a mother get flowers brought to them EVERY day of the week?? 

What's not to like about this season?? 

And then...all of a sudden...dandelion bouquets got all that much better. One of my friends posted a poem she had written. It's just beautiful. When I read it, I got goosebumps and as my son says, "my throat felt sad." I asked her if I could use it in a craft for my day home kiddies and she said yes. Thank you Makiko! You made a bunch of parents smile.

For those of you who would like the poem in it's entirety, head on over to this lovely blog...


And for those of you who would like a little craft to do with your kidlets, stay right here for the fun...

You will need...

A small metal bucket for each child
Acrylic paints
Mod Podge
Paint brushes
Ribbon (cross grain works the nicest)
The poem printed for each child
Pretty paper for mounting
Rubber stamp (optional)
Markers
Hole punch
Laminator (optional)
Smocks!! It gets messy!

Give each child a bucket and let them get painting!

Don't worry if they glob it on...it will dry just the same :)

Set them outside to dry...this may take a couple of hours, so make sure you plan ahead.

While their buckets are drying, allow the children to colour and stamp their printed copy of the poem.

Then they can glue the back and mount it on patterned paper.

I find that parents are more likely to keep things if they are laminated...well, I am anyway! So I laminated each poem. This way, the parents can use the poem as a bookmark later, or put it on their fridge.

Cut 8 inch sections of ribbon for the top corner of each poem, And then 8 inch sections X 3 to tie on each bucket handle.

Now it's time for the sticky part! Break out the Mod Podge!

Once the buckets are dry, let the children coat their paint job with Mod Podge...
They will be messy and glob it on all over the place. If you can't handle it, don't watch! Heheheh! And then when they are not looking, you can smooth out all the gloppy parts.

When they are all dry, you can tie the ribbons on the handle with knots. 3 on one side and then knot the tag on the other side...


Now, if you haven't already, go out and pick some of those pretty yellow blossoms and fill your buckets up til they overflow. Add a bit of water, or let them wait until their buckets are safely home so water doesn't spill on the journey.
Now it's all ready! 

Seasons of dandelions will always be. But our little ones won't. They will grow and like puffs on the breeze, they will be off in the world. I know I will treasure each and every bouquet I am given. Every fistful of yellow weeds will be as precious as the one before it.
Thank you, Makiko for your beautifully crafted words.

I really would take a dandelion bouquet any day over a thousand roses.

Thanks for stopping by, and HAPPY FIRST DAY OF SUMMER!!!