Monday, January 23, 2012

Making a Big Splash...


 I can't think of anything that makes my children and myself happier than playing in water...I mean, take a look!


What is more fun than a good splash? 

So why don't we do it more often? Because it's cold outside? It's not summer anymore? Ha! Bring it inside! Because it's messy? Boo! There is nothing cleaner than water! Because it's too much work? Phooey! Since when was fun too much work?

There is no other medium out there that is more beneficial to play in, than water.


It's an all-sensory experience...feeling, tasting, smelling, seeing, and hearing, Fine motor skills are honed by pouring, squeezing, and swirling. Cognitive skill are developing as they measure, mix, and imagine. And don't forget the emotional side of water play. How often are your raw nerves soothed by an evening bubble bath? How often are you refreshed and energized by a morning shower? Being in, and playing in the water can change a child's emotional state in just a few minutes. So, no more excuses! Get playing! It doesn't have to be complicated. A simple bin full of water, measuring cups, funnels, and tub toys would do the trick!

For those of you who want more ideas for playing in water, the next few posts will be just the thing for you! I am going to divide this post into 6 parts, so it's not so overwhelming. One activity per day. And I'm not saying you have to DO the activities 6 days in a row! I'm just going to give you a new idea each day so it's not all piled up in one giant post!

That's 6 days worth of water play time coming up...are you ready to get wet??

DAY #1
BUILD YOUR OWN OCEAN...
Supplies needed:
1. A plastic washtub, bin, or water table.
2. Salt. (makes the sensory experience even better!)
3. Seashells (pet store, craft store, dollar store, or the REAL beach, if you can!)
4. Blue and green food coloring..we mixed a bit of both to give it a mediterranean feel.
5. Plastic ocean critters.
6. You can also put sand on the bottom of your bin if you want it really authentic.

Color your water, add the salt and critters, and you are ready for some great imaginative ocean play.

An oyster shell water fall...

A rainstorm at sea for the lonely fisherman...

A deep sea rescue mission...

A peaceful playground for the orcas...

I know many adults who long to see the ocean and be near it every day. Children are no different. The ocean holds a special magic that soothes and delights. Why not bring it into your own kitchen for a day or two? And if you have a cd or itunes track with whale or ocean sounds...put that on in the background to create an even better, all-round sensory experience.

 I'll see you tomorrow for another water play idea!

Thanks for stopping by!


Saturday, January 21, 2012

Baking Sensory Bin...


Just a quick post to show you one of our new and most played with sensory bins. It is essentially homemade "moon sand" in a bin with all kinds of baking/cooking accessories. It is very simple to put together and not as messy as you might think. I bet you have all the things you need to make it already in your house!

You can use any type of cooking oil if you wish. I use baby oil because it smells good! Mix all these ingredients INSIDE your bin to minimize the mess.

Add all kinds of plastic cooking/baking/kitchen accessories to your bin and then get started!

The "dough" will maintain its shape when pressed or packed, but will fall apart when little hands muss it up. It's the perfect consistency for scooping, rolling, mixing, moulding, and "baking".

When the children are finished playing, put the lid on it and store it away until next time!
Happy baking!!!

Thanks for stopping by!

Tuesday, January 10, 2012

Now I Know My ABC's...


I know you have all seen a million and one abc books out there...but how many of them were tailored just for your little ones? Well, if you're willing to put in a little bit of busy work, and a whole lot of imagination, I've got just the book for you. And this one will not be left on the shelf to gather dust. This one will be treasured for a good long time. The one in the photograph happens to be 5 years old, and used everyday. It can't be torn. It can't get soggy. It can't lose its shape. And it will not lose it's appeal...I promise!

1.  Your first step is probably going to be your longest step, but not without it's rewards. You get to sift through your photographs and find one that best represents each letter in the alphabet...
My daughter's name happened to start with the first letter of the alphabet...how lucky is that?
One side of your book pages will have a letter, and the other will have a photograph...
These were the cupcakes at her 1st birthday party...


You'll find once you get going, you will be inundated with possibilities! 


2. Your next step is to cut 27 squares of black card stock, each square being 4inches by 4inches. I chose black card stock because it goes well with whatever you choose to put with it, but you can decide on which color suits you.

3. You also need to cut 2 more 4"x4" squares out of a patterned card stock of your choice. These will be the front and back covers of your book.

Now that you have all that searching,measuring and tedious cutting done, the fun begins!
You can start pasting and cutting and scrapping and creating your book!

 4.  * This next step is important, or your book will not have the right ratio of pages to photos...
The front cover is decorated only on the front side. Leave the inside of the front cover blank. Now the back side of the letter A will become your "dedication" page, if you will. This is what mine looks like on the back side of the ABIGAIL page...
Now when you flip this page, you will have the start of your ABC's. Each letter should have a 2 page spread. It doesn't matter if your letters or photos are on the right or the left of your spread...you can choose what looks best to you!

Here are some photos of a few of the pages in Abigail's book, to help you along...

D is for Duck was created with a rubber stamp, pencil crayons, and alphabet stickers...

F is for Fairy was created with rubber stamps, water color pencils, and a sticker which I sanded with a sanding block.

J is for Jessie was created the same way. Jessie is the name of my older daughter's mare. Try and use photos of things your little one loves most...this way it will mean much more to her!

M is for Mumma was created with cutouts and rub-on letters...a very simple page, not a lot of fuss.

O is for Oweeee! Another simple page. but with a lot of emotion ;)

Q is for Quiet is just a sanded sticker on cardstock. The rest is printed on the computer.

V is for Velveteen Rabbit has a photocopied page of Abby's favorite book as it's photo.

X is the toughest letter...so here's an easy solution! X Marks the Spot! This was printed out on the computer and glued to card stock.

And Z is for Zebra...I snapped this photo at one of our many trips to the zoo. And boy, was I glad I had! What else do you use for a z???

This is the inside of the back cover...I couldn't bear to leave it blank. I'm a color junkie, and it had to be addressed! So I made it into a love note page.

When you have all your squares decorated and pasted, take them to get them all laminated. When you trim the laminate, be sure to round the corners so little fingers don't get poked. Then punch 2 holes in each little square. Then add your 3 inch binder rings to them to hold them all together...
I tied various pieces of ribbon and rick-rack around a section of the rings so the book looked just that much more fun. And there you have it!! All done and ready for your little one!


This project is not an overnighter, so don't beat yourself up if it takes you months to finish!! I worked on this a little bit every time I scrapbooked...my friend was making one too, so we got together and built our books whenever we could. 

I hope you have as much fun building your book as I did! Enjoy!

Thanks for stopping by!


Thursday, November 17, 2011

Building a World in a Box...


This post was inspired by the Pink and Green Mama.
I was reading her blog and stumbled on her halloween sensory bin. Suddenly I was filled with ideas and couldn't wait to get building little worlds in a box for my own little ones to discover. 
My kids and I spent the weekend hunting and gathering, scavenging, and searching for things we could put in our little bins. The following photos and ideas are the culmination of many minds...my own 6 kids, myself, and a remarkable woman who calls herself the Pink and Green Mama.

First of all...you need to know one very important rule about building a sensory bin...
THERE ARE NO BAD IDEAS!
(Unless, of course, you try and fill a bin with organic red quinoa that works out to be $33 for a bag HALF the size of a loaf of bread!!) 

The first bin we decided to build was the "Farm in a Box"
We chose split peas for the substrate and then filled it in with all kinds of plastic farm animals. And what farm is complete without tractors? A trip to Peavey Mart had us all stocked up in al colours and styles. We even found a little plough attachment. We added a little stable, some fences, wheel barrows, buckets, hay bales, plastic veggies, and animal brushes.
Little piggies eating from the trough...

Little baby chicks peck away at the grass...

Don't worry if all your pieces are not to scale. This is not a science of exactness, it is a science of discovery and imagination! 
Feel free to add whatever YOU might think 
would be fun in your "farm in a box"

Our next little world we built was a "Dinosaur Dig in a Box"
The substrate is barley, a few split peas, and a bag of mixed beans. Note that each bin took approximately four 900g bags of substrate. Oh, and my 10yr old son added broken pieces of dried wholewheat spaghetti so he could make "nests" for the dinosaur eggs.
Most of them were purchased at WalMart for less than $2 a bag.
The fossil heads were purchased in a tube at Michaels Craft Superstore. And you can find plastic dinosaur skeletons and figurines just about anywhere now... dollar stores, Chapters, toy stores, etc. We added a couple mini garden rakes for "digging up bones."
We added a few "live" dinosaurs to further extend the play possibilities of this bin. The boys especially love the "carnage" this box lends itself to! Hehehehehe! The beans become the eggs and then the egg stealers steal the eggs, and then the cranky mumma comes along...and well...this is NOT a quiet world in a box! That's for sure!

Our next bin is "Outer Space in a Box"
This one was very simple and quick. We used four bags of black beans, 2 bags of glow in the dark stars from the dollar store, a couple bags of sparkly pompoms for "meteors", a tube of plastic planets from ToysR'Us, and a yellow bouncy ball for the sun. Then we added a tube of astronauts and satellites, rockets, moon buggies, and space shuttles.
This is a great bin for learning your planets! And the best part is, the stars glow in the dark, so it's even fun with the lights off!

Now this box is my favourite box! It's an "Under Water Kingdom in a Box"
The substrate is 3 bags of aquarium gravel. Then we added a bag of plastic jewels, which we found in the fish section of the pet store. We also added 2 bags of store bought seashells...99cents/bag at Pet Smart. I also had some real oyster shells that I had collected on the beach in the spring so I put them in the box. My 6yr old daughter immediately fashioned an oyster shell chair for her mermaid. 
You can fill your under water kingdom with all sorts of plastic ocean creatures. We also put little 99cent aquarium plants in ours to make more places for little sea animals to hide.
A lobster jewel thief...

...and his octopus accomplice!

The underwater kingdom has so many possibilities, and hours of imaginative play awaits!


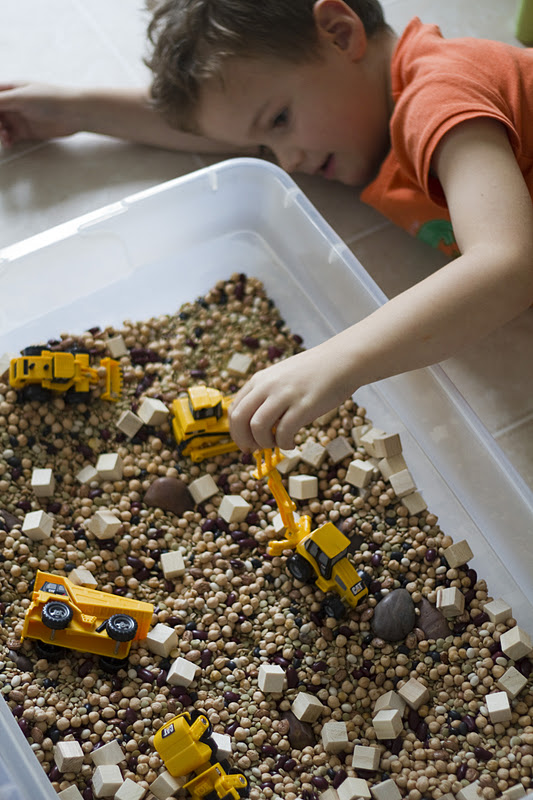
Our final box was built entirely by my ten year old son. 
It is "Construction Site in a Box"
He chose dried chick peas, green lentils, wheat, and a bag of mixed beans for the substrate. He added a bag of shiny brown rocks from the aquarium section of the pet store, and 2 bags of wooden blocks from the craft section of the dollar store.
We bought an $8 set of mini CAT machines at ToysR'Us and the hauling and scraping, filling and dumping began!
My 5 year old son plays with this one for hours...right from the time he wakes up in the morning!


The following Monday, I added our little "worlds in a box" to my dayhome space. The kids played with one after the other, after the other. 

They were a hit! The only trouble the kids had with the bins, was...
"WHICH ONE DO I CHOOSE???"

Please let your imaginations fly when you build your worlds. The sky really is the limit! We are already collecting items for our "Winter in a Box"...the kids can't wait for this one! And if you build your own boxes that are different than the ones posted here, would you please come on back and tell me about them? I'd sure love to hear your ideas!!

Thanks for stopping by!!