Saturday, January 28, 2012

Chalk n' Water Centre...


For a long time, I had wanted to add an easel painting space to my house. A place where the kids were free to go and paint on a whim. But the space in my little house is limited and the potential to have paint on my carpets and walls and furniture is at an all time high! I had already put a chalk centre on the outside of my kitchen island and my lovely, and brilliant cousin Krymsen suggested I let the kids paint with water and brushes on the chalkboard.


Well, didn't I love this idea? The children could paint as they pleased, my furniture and carpets would remain safe, AND my chalkboard would get a cleaning! And so I added one more bucket to the wall. The first one contains chalk and brushes. The second one contains brushes, and when the kids want to paint, I unhook it from the wall and fill it with a bit of water and put it on the floor in front of the board.

It is now the "go to" spot for my toddlers when I am preparing meals. They love it! And there are no rules, except for "no sucking the paint brushes!"


And there you have it...6 days of fun water water play activities that you can do inside your home...even on the coldest of days!

Happy painting!
Thanks for stoping by!

Friday, January 27, 2012

Little Scientists...Colour Mixing!

I know you've all seen it. Water, food colouring, colour mixing, blah blah blah. But don't underestimate the allure AND the benefits that this simple science experiment holds for children of all ages. The fine motor skills, the cause and effect, the predicting, the observing...oh the may wonders of colour and water!! So what are you waiting for??

Day #5
LITTLE SCIENTIST...COLOUR MIXING

Supplies needed:
1. Food colouring
2. Jars or glasses, or see thru cups
3. Medicine droppers...I use these instead of turkey basters because it helps them master the prewriting "pencil grip".
4. Empty clear egg cartons. The clear ones help the children see their mixed colours better.

Fill your jars with coloured water...make the colours quite strong so they will mix in all kinds of pretty ways.

Let the children start mixing!
They get very serious about creating JUST the right colour. Abby wanted to make "medicine" colour, and she worked and worked at it until she was happy with her result.
Busy scientists!
Even the toddlers love to get involved!!

Have fun, and happy mixing!
Thanks for stopping by!

Thursday, January 26, 2012

Small World Play...Building our own Aquarium!

Well, we've made it to day four of our Water Week, and we are all a bit wet around here. Today's activity was probably our favourite one of all. We built our own small world aquarium. 
We talked about habitats and how all living creatures have a habitat that they thrive in best of all. The ocean animals that we chose to have living in our aquarium were given a habitat that the children thought resembled most "authentic." 
This is how the morning went...

DAY #4
SMALL WORLD PLAY-BUILDING OUR OWN AQUARIUM...

Supplies needed:
1. Empty salad or veggie containers, even the cake toppers from grocery store cakes, and jars work too!
2. Aquarium rocks, seashells, plastic plants, rocks, and any other materials you think might work in building habitats.
3.  Plastic ocean creatures.
4. Dollhouse "visitors"
5. Water and food colouring.
6. Paper, marker, and tape to make the habitat signs.


Now it's time to build your habitats. I let the children decide which animals to put in each container and they chose all the accessories...
They chose the large cake topper container for the whales, as they need more space!

They thought the sharks should have green water!

Our rays got the pretty seashells and clear water so they would be clearly visible.

They put the octopus in the jar so he could spread out his tentacles!

The whale shark has my favourite habitat...the colours the children chose just look so pretty!

And the alligator got a climbing rock so he could come out of the water sometimes.

And then the playing began in earnest! So many visitors to our aquarium!

The visitors even got to swim with our creatures and experience the habitats first hand!
And then the fun REALLY began! 

Enjoy this fun "habitat creating" activity with the small people in your life. It's guaranteed fun! Oh, the things they can learn as they play. And please don't fret about the mess...it all comes dry with towel or two! 
Thanks for stopping by!


Wednesday, January 25, 2012

Bubbly Babies...


Good morning! We have reached day 3 of our water week already! This activity was geared toward the toddlers in my group. They love water. They love baby dolls. They love bubbles. So what could be better than a morning of bathing their dollies?

DAY #3
BUBBLY BABY DOLL BATH...

Supplies needed:

1. Wash tub, rubbermaid, or water table
2. Bubble bath or baby shampoo to make the water bubbly
3. Washable baby dolls
4. Washcloths, sponges, or scrubbies
5. Pretend shampoo (empty old ones, or doll size play ones)
6. Food coloring...we used it to make our bath pink. I just adds to the whole sensory experience!
7. A few rubber ducks if you have them, because what's a bath without a rubber duck?


Now...you might want to remove the socks for playtime, as the floor WILL get wet! Water play is so much more fun if you don't have to worry about wet socks, wouldn't you agree?

Smocks or aprons might be a good idea too...
We just used bibs, as they are waterproof, and the toddlers weren't tall enough to need any "tummy covering"

Your toddlers will take great care in bathing their babies...
And everyone will be so squeaky clean when you're all finished!

Happy, happy kids!

And some really sweet bubbly toes!

Enjoy your bath!
Thanks for stopping by!

Tuesday, January 24, 2012

Ice Block Critter Melt...DAY 2 of Water Week!


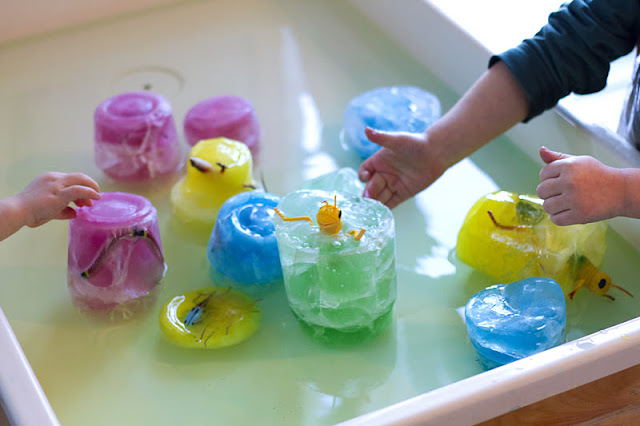
Hello again! It's time for Day 2 of our water week extravaganza. And this one is super easy! Especially in the winter here in Canada. I took advantage of the giant deep freeze that my patio has become, and I filled every empty yogurt, cottage cheese, dip, or dairy container I had with water. Then I dropped some food coloring into each container. I gathered up as many creepy, crawly critters that I could find in the house and put them into the colored water. Then I put them all outside on the patio...

It didn't take more than a few hours to freeze...as it was -47 degrees Celsius that day. Brrrrrr! If you suffer (*wink) from a warmer climate, use your freezer and put them in the night before. 

When they are frozen and you are ready to play, run the containers under hot water for awhile to loosen the ice blocks. Drop them into a bin or water table already half filled with water.

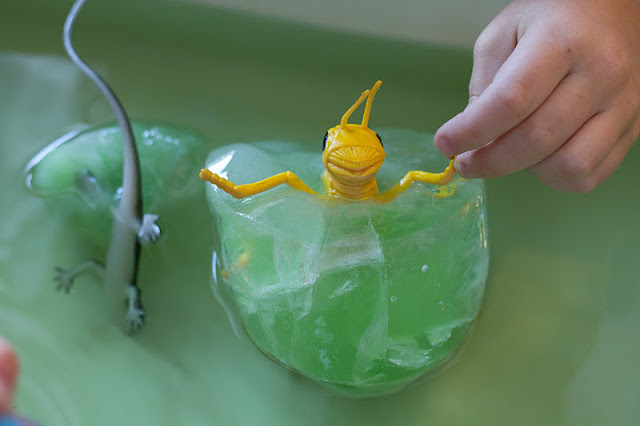
Here is a snake encased in ice...it looks pretty neat. The children will love swirling the melting colors into the water, and watching the critters emerge from the ice.

The kids in my house were squealing and giggling and carrying on...it was the noisiest "ice melt" my kitchen had ever seen!
And it was such eye candy for ME! 

DAY #2
ICE BLOCK CRITTER MELT...

Supplies needed:

1. Empty plastic containers
2. Water
3. Food Coloring
4. Wash bin, rubbermaid, or water table with water
5. Plastic critters (lizards, bugs, snakes, or any other things you're in the mood to freeze!)

Have fun and enjoy! Maybe shake hands with a grasshopper while you're at it!

See you tomorrow for more water fun!
Thanks for stopping by!


Monday, January 23, 2012

Making a Big Splash...


 I can't think of anything that makes my children and myself happier than playing in water...I mean, take a look!


What is more fun than a good splash? 

So why don't we do it more often? Because it's cold outside? It's not summer anymore? Ha! Bring it inside! Because it's messy? Boo! There is nothing cleaner than water! Because it's too much work? Phooey! Since when was fun too much work?

There is no other medium out there that is more beneficial to play in, than water.


It's an all-sensory experience...feeling, tasting, smelling, seeing, and hearing, Fine motor skills are honed by pouring, squeezing, and swirling. Cognitive skill are developing as they measure, mix, and imagine. And don't forget the emotional side of water play. How often are your raw nerves soothed by an evening bubble bath? How often are you refreshed and energized by a morning shower? Being in, and playing in the water can change a child's emotional state in just a few minutes. So, no more excuses! Get playing! It doesn't have to be complicated. A simple bin full of water, measuring cups, funnels, and tub toys would do the trick!

For those of you who want more ideas for playing in water, the next few posts will be just the thing for you! I am going to divide this post into 6 parts, so it's not so overwhelming. One activity per day. And I'm not saying you have to DO the activities 6 days in a row! I'm just going to give you a new idea each day so it's not all piled up in one giant post!
That's 6 days worth of water play time coming up...are you ready to get wet??

DAY #1
BUILD YOUR OWN OCEAN...
Supplies needed:
1. A plastic washtub, bin, or water table.
2. Salt. (makes the sensory experience even better!)
3. Seashells (pet store, craft store, dollar store, or the REAL beach, if you can!)
4. Blue and green food coloring..we mixed a bit of both to give it a mediterranean feel.
5. Plastic ocean critters.
6. You can also put sand on the bottom of your bin if you want it really authentic.

Color your water, add the salt and critters, and you are ready for some great imaginative ocean play.

An oyster shell water fall...

A rainstorm at sea for the lonely fisherman...

A deep sea rescue mission...

A peaceful playground for the orcas...

I know many adults who long to see the ocean and be near it every day. Children are no different. The ocean holds a special magic that soothes and delights. Why not bring it into your own kitchen for a day or two? And if you have a cd or itunes track with whale or ocean sounds...put that on in the background to create an even better, all-round sensory experience.

 I'll see you tomorrow for another water play idea!

Thanks for stopping by!